Create and Manage Invoices
Last updated July 6, 2026 · Admins and office staff
This article covers the full life of a manually created invoice: building it, reviewing it on the Invoice Summary page, editing or deleting it, and getting it in front of the customer by email or print. For invoices the system generates for you, see Batch Billing and Automatic Invoicing — once created, those invoices are managed on the same Invoice Summary page described here.
Before you start
- The customer must already exist, and — because Job is a required field on the invoice form — the customer must have at least one job. Create the job first if needed.
- Each job can carry only one active invoice. If the job already has one, you’ll be blocked with “An invoice already exists for this job. Edit or void it before creating another.”
- Optional: Products/Services set up (with unit prices and taxable flags) if you want line items to auto-fill prices and tax treatment.
- To email invoices: the customer needs an email address on file, and email sending must be configured on your server.
Steps
Create an invoice
- Go to Sales and click Create Invoice (top right; there’s also a Create Invoice button in the workflow guide).
- The Invoice Number is assigned automatically — you can’t change it.
- Select the Customer (required). Their email and billing address appear for reference, and the Job dropdown fills with that customer’s jobs.
- Select the Job (required).
- Check the dates: Invoice Date defaults to today, Due Date defaults to 30 days out (or the job’s Invoicing Terms once a job is selected). Both are required, and the due date can’t be earlier than the invoice date.
- Add line items in the table. For each row:
- Product/Service — optional; picking one fills in its unit price and tax treatment.
- Description — free text for what the line is.
- Qty — whole numbers only.
- Rate — price per unit.
- Amount — calculated automatically (Qty × Rate); you can’t type it directly.
- Use Add line / Delete line below the table to manage rows.
- Review the totals box: Sub Total, Tax (a percentage you can edit), Tax Amount, and Total are calculated for you. Tax only applies to lines whose product is taxable, and only if sales tax is on for the invoice.
- Optional: click Show Invoice Settings to toggle Use Product Service Column, Use Qty/Rate Column, and Use Sales Tax On Invoice? for this invoice (defaults come from your company settings).
- Click Save.
Review it — the Invoice Summary page
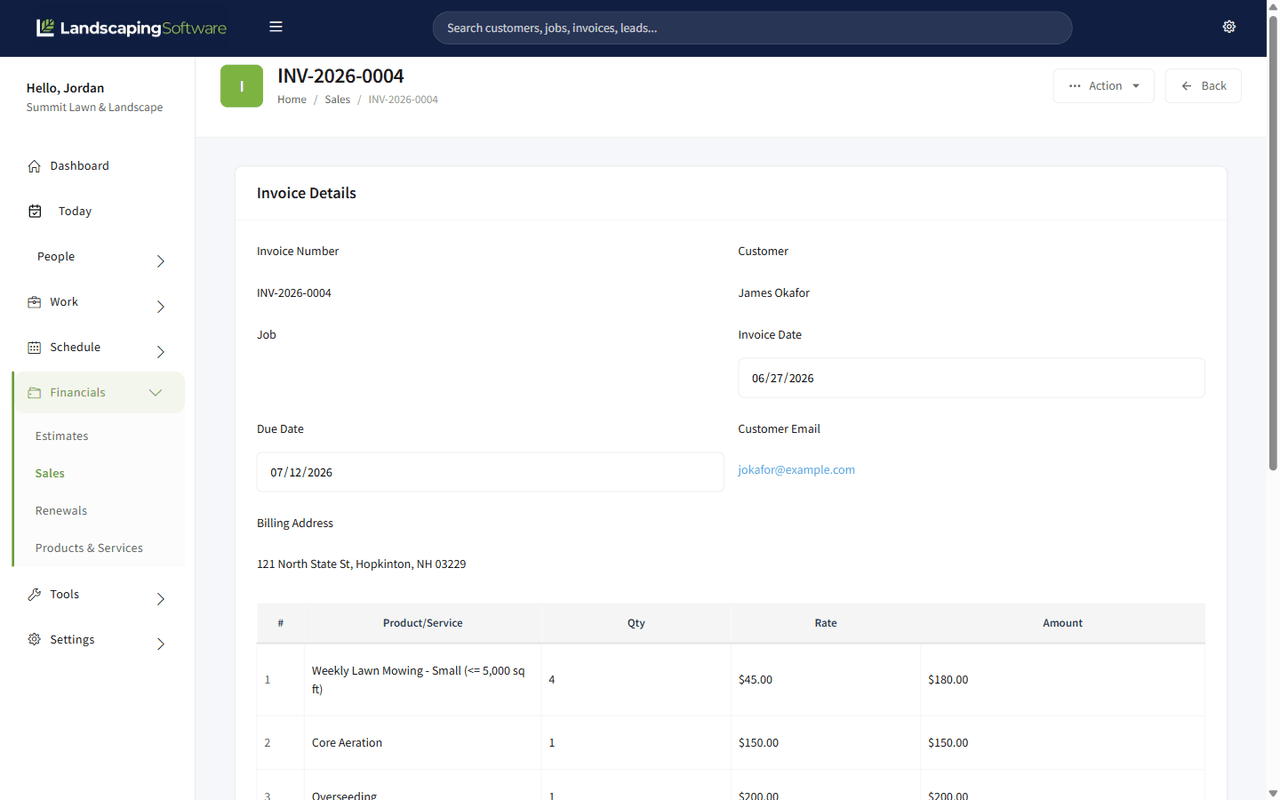
After saving you land on the Invoice Summary with the message “Invoice created successfully. Email it to the customer or record payment when money comes in.” This page shows:
- Invoice details — number, customer, linked job (clickable), dates, customer email, billing address.
- Line items and totals — with a status banner: green Paid when paid in full, yellow Partially Paid with the remaining balance otherwise. Partially paid invoices also show Amount Paid and Balance Due rows.
- Payment History — every payment applied to this invoice, with date, payment number (clickable), method, reference, and amount.
- Customer deposit on file — if the customer has an unapplied estimate deposit and the invoice has an open balance, a card appears with an Apply to this invoice button. The applied amount is capped at the invoice’s open balance and counts like any other payment.
- The Action dropdown (top right) — Delete, Receive Payment, Print Invoice, Print View, Email Invoice (options appear/disappear based on payment state; see below).
Edit an invoice
Editing is only possible before any money is applied. On an untouched invoice the summary page shows a Save button and editable fields:
- Change the Invoice Date or Due Date directly.
- Change line items — product, quantity, rate — or use Add line / Delete line. Amounts recalculate as you type. (Note: when editing, every line must have a product selected.)
- Adjust the Tax Rate if needed; totals are recalculated server-side when you save.
- Click Save. You’ll see “Invoice updated successfully.”
Once even a partial payment exists, the fields become read-only and the Save button disappears. To change a paid-against invoice, delete its payments first (see Record Payments), edit, then re-record them.
Email an invoice
- Open the invoice and choose Action → Email Invoice (the workflow guide’s email link does the same thing).
- The system generates a PDF of the invoice and emails it to the customer’s email address on file, with subject “Invoice [number] from [your company]” and the total in the body. The link shows “Sending…” while it works.
- You’ll see “Invoice emailed to [address]” on success.
If the customer has no email on file you’ll be told to add one on the customer page first. If email isn’t configured on your server, use Print Invoice instead.
Print or download a PDF
Two options in the Action dropdown, both opening in a new tab:
- Print Invoice — downloads a ready-made PDF file of the invoice (same document the email attaches).
- Print View — opens a clean, print-formatted web page (with your company’s document header/logo, line items, amount paid, and balance due) and uses your browser’s print dialog — print it or “Save as PDF” from there.
Delete an invoice
- Open the invoice. Action → Delete is only offered when no payments have been applied.
- Click Delete and confirm “Are you sure you want to delete this invoice?”.
- You’re returned to Sales with “Invoice was successfully deleted!.”
If payments exist, deletion is blocked: “Please make sure all payments to this invoice have been deleted before trying to delete the invoice.” Delete the payments first, then the invoice.
What happens next
- Creating an invoice for a job advances that job’s workflow status to Invoiced.
- The invoice appears in the Sales list as Open (or Overdue once past due) until payments arrive; see Record Payments.
- When it’s fully paid, the invoice is flagged Paid and the linked job is automatically moved to Closed.
- If the Customer Portal is enabled, the customer can also see and pay the invoice online — see the Customer Portal overview.
Tips & best practices
- Email the invoice right after creating it — the summary page nudges you to do exactly that, and the PDF attachment means the customer has something they can file.
- Set unit prices on your Products so line items fill themselves in; you’ll only type quantities.
- Need a different invoice for the same job? Because each job allows one active invoice, delete/void the old one first — or treat additional work as a new job.
- Deposits first: if the customer paid a deposit on an options proposal/estimate, apply it from the “Customer deposit on file” card before chasing the balance.
Troubleshooting
- “Job selection is required” / Job dropdown is empty — the selected customer has no jobs yet. Create a job for them first.
- “An invoice already exists for this job” — one active invoice per job. Open the existing invoice from the job’s summary and edit it instead.
- Can’t edit the invoice / no Save button — payments have been applied. Delete the payments first if you truly need to edit.
- “This customer has no email address on file” — add an email on the customer’s profile, then retry Email Invoice.
- “Email sending is not configured on this server yet” — your installation doesn’t have outbound email set up; use Print Invoice to download the PDF, or contact support.
- Delete isn’t in the Action menu — same rule as editing: it only appears while nothing has been paid.
- Tax Amount stays $0 — either the invoice’s “Use Sales Tax” setting is off, the tax rate is 0, or every line’s product is non-taxable.
Related articles
- Invoicing Overview — the big picture: manual vs. batch vs. automatic
- Record Payments — get the money onto the invoice
- Batch Billing — generate many invoices at once
- Automatic Invoicing — let the system create invoices for opted-in jobs
- Create a Customer — the record everything hangs off