How to Create an Estimate (Leads & Estimates)
Last updated July 6, 2026 · Admins and office staff
An estimate is a priced proposal for work — a one-time project or recurring maintenance. You can attach it to a lead (a prospect) or directly to a customer, build it line by line from your product catalog, offer optional add-ons, and set deposit terms. Once accepted, an estimate converts into a job.
Before you start
- An operator account with access to the Leads menu (estimates live alongside leads).
- Who is it for? Create the estimate from a lead’s summary page, from a customer’s summary page, or from the Estimates list (where you pick the customer from a dropdown). An estimate can also be created unassigned, but it can’t be converted to a job until it has a customer.
- Optional but recommended: set up your Products catalog first — line items pull descriptions and unit prices from it.
- If you plan to collect a deposit online, Stripe and online payments must be configured — see Deposits on Estimate Acceptance.
Steps
- Open the create form from wherever fits:
- Lead Summary → Create Estimate — the estimate is linked to that lead (a banner at the top shows the lead’s name, email, and phone).
- Customer Summary → estimate/quick actions — the estimate is linked to that customer.
- Estimates page → Create Estimate — pick the customer yourself from a searchable Customer dropdown; once selected, the Job Site dropdown loads that customer’s sites.
- Fill in Basic Information:
- Estimate Name (required) — the only field the form blocks on.
- Version — defaults to “A”. Use B, C, etc. for revisions.
- Estimate Type — Standard (One-time/Project) or Service (Recurring Maintenance). Choosing Service reveals an extra Service Details card.
- Status — defaults to Draft. You can set it manually (Sent, Accepted, etc.) but usually leave new estimates as Draft.
- Description — free text.
- For Service estimates, fill in Service Details:
- Frequency — Weekly, Bi-weekly, Monthly, Quarterly, or Yearly.
- Billing Mode — Per-Visit, Monthly Fixed, or Seasonal Prepay.
- Route Intent — free text (e.g. “North Route”) to guide scheduling later.
- Season — picking a season auto-fills the Season Start/End Date fields below it (you can still adjust them).
- Check the Dates card. Estimate Date defaults to today and Expiry Date to 30 days out. Expired estimates can no longer be approved by the customer in the portal.
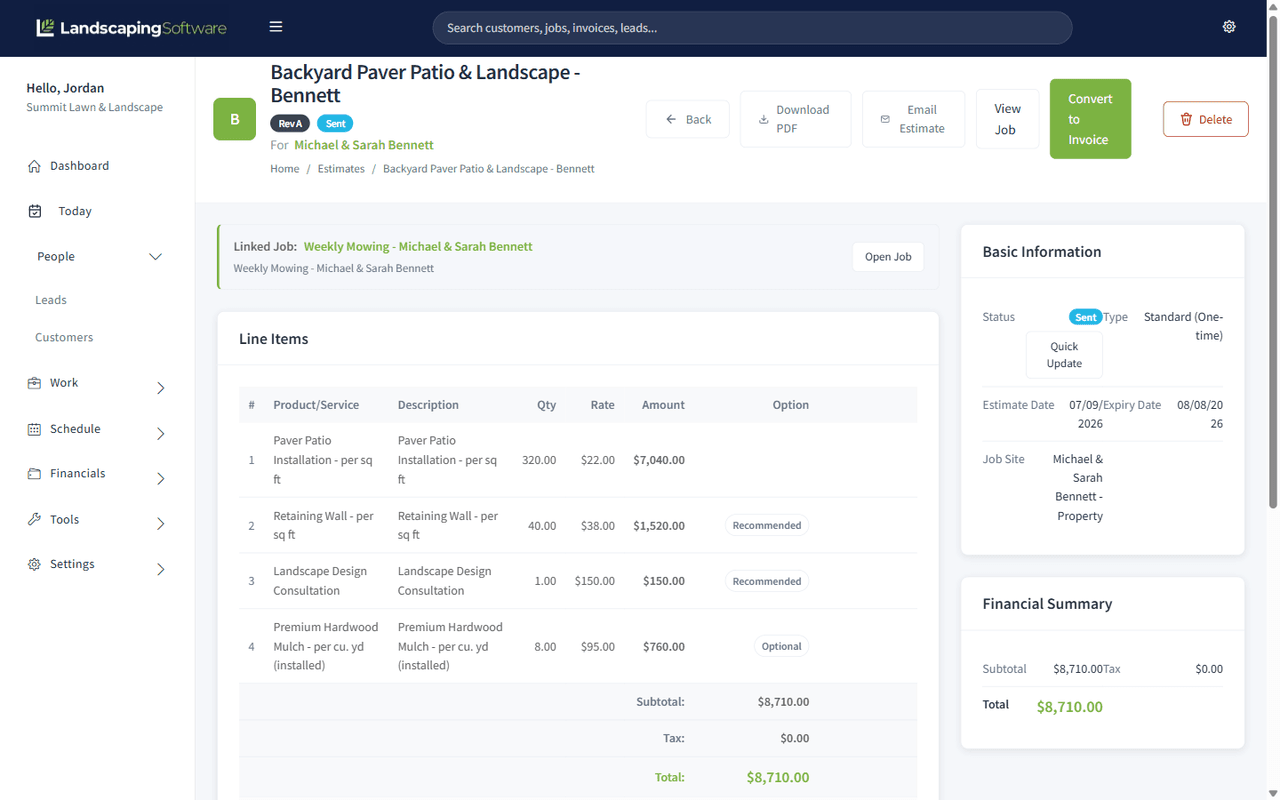
- Build the Line Items. Click Add Line for each row:
- Product/Service — picking a catalog product fills the Rate with its unit price (you can override it).
- Description — free text; use it alone for ad-hoc lines with no catalog product.
- Qty × Rate — the Amount column calculates automatically.
- Option — leave as Required for normal lines. Recommended / Optional turn the line into a customer-selectable option — see Options-Based Proposals.
- Remove a row with its trash button, or Delete Line to remove the last row.
- Review the totals. Subtotal sums the included lines. Tax is calculated automatically when your company has sales tax enabled and the customer isn’t tax-exempt (only taxable products are taxed) — you can type over it to override. Total = subtotal + tax.
- Set the Deposit terms if you want money down on acceptance. The card is pre-filled from your company defaults; choose No deposit, Requested (optional for the customer), or Required to accept, then percent or fixed amount. Details in Deposits on Estimate Acceptance. If online payments are disabled, the card warns you the deposit won’t be chargeable yet.
- Add Notes:
- Client Notes — customer-facing (scope, exclusions, warranty). These appear on the printed/PDF estimate.
- Crew Notes — internal, for field crews.
- Change Log — what changed between versions (e.g. “Rev B: Updated pricing, added mulch service”).
- Click Create Estimate.
What happens next
You land on the new Estimate Summary page with the banner “Estimate created successfully. Review it, then send or accept it when ready.” From there you can keep editing, download a PDF, update the status, and — once the estimate is Accepted and linked to a customer — convert it to a job. See Manage Estimates.
If the customer uses the Customer Portal, the estimate is visible there as soon as it’s linked to their customer record — they can review, choose options, and e-sign it online. See Estimate Approval in the Customer Portal.
Tips & best practices
- Use catalog products rather than free-typed lines wherever possible — you get consistent pricing, correct taxability, and cleaner reporting.
- Pick the right type up front. Service estimates carry frequency, billing mode, season, and route intent into the job conversion; Standard estimates are for one-off projects.
- Version instead of overwrite. For a materially revised quote, bump the Version field and note the change in the Change Log — especially once an estimate has been sent.
- Set the expiry date deliberately. It protects you from a customer accepting last season’s pricing months later.
- Mind portal visibility. Every estimate linked to a customer shows up in their portal (if the Estimates section is enabled) — including drafts. Keep an estimate attached only to the lead, or hold off linking the customer, until you’re ready for them to see it.
Troubleshooting
- The form won’t submit — Estimate Name is required; make sure it’s filled in.
- Job Site dropdown is empty — select a customer first; sites load after the customer is chosen. If the customer truly has no job sites, add one from their customer summary.
- Tax stays at $0 — sales tax may be disabled in your company invoicing settings, the customer may be tax-exempt, or the products on the estimate aren’t marked taxable. You can always type a tax amount manually.
- Tax recalculates over my manual value — once you type in the Tax field yourself, the form stops auto-recalculating it for that visit; if it looks wrong, re-check the line items and re-enter the tax.
- “The selected season / job site / product is not available” — the item was deleted or belongs to different data than the form expected. Re-open the form and re-select from the current dropdowns.
- Deposit fields disappeared — you chose No deposit; the type/percent/amount fields only show when a deposit mode is selected.
Related articles
- Manage Estimates — statuses, editing, printing, deleting, converting to a job
- Options-Based Proposals — Required / Recommended / Optional lines and e-signed acceptance
- Deposits on Estimate Acceptance — collecting money down when the customer accepts
- Estimate Approval in the Customer Portal — the online approval flow
- Leads Overview — the lead pipeline this estimate belongs to
- How to Create a Customer — set up the customer an estimate needs before job conversion