How to Find, Search, and Filter Customers (Customers)
Last updated July 6, 2026 · Admins and office staff
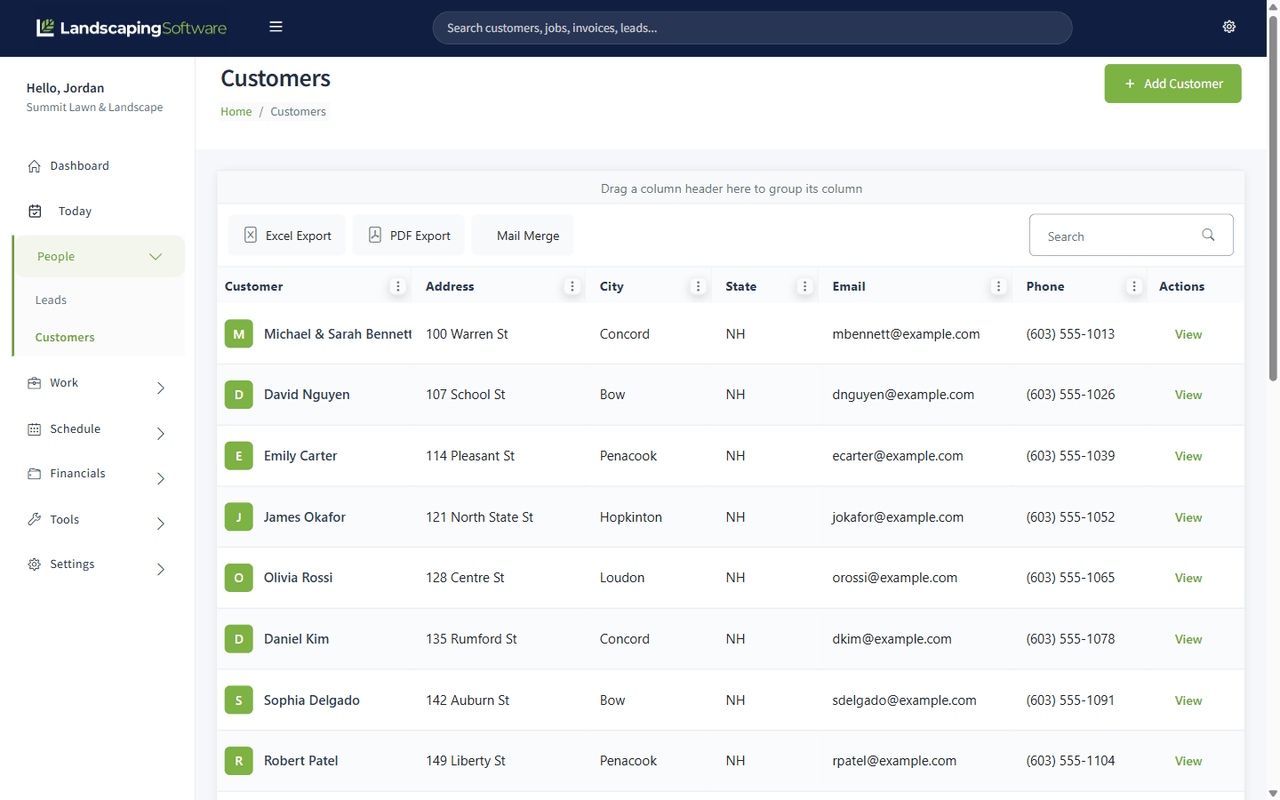
The Customers page is your customer directory — every customer account in one searchable, filterable list. From here you can look up any customer, jump into their profile, export your customer base to Excel or PDF, or kick off a mail merge on a filtered group. To add a new customer instead, see Create a Customer.
Before you start
- An operator account with access to the Customers menu.
- Nothing else is required — the list simply shows whatever customers exist. If you haven’t added any yet, the getting-started guide at the top of the page walks you through the first steps and offers an Add Customer button.
Steps
- Go to Customers. You’ll see the customer list with the breadcrumb Home / Customers and an Add Customer button in the header.
- Search: click the search box in the grid’s toolbar and type any part of a name, address, email, or phone number. The list narrows as you search.
- Sort: click a column header to sort by it. Click again to reverse. You can sort by more than one column at a time.
- Filter: open a column’s menu (the icon on the column header) and choose Filter to show only rows matching a value — for example, only customers in a certain city or state. The column menu also lets you group by a column and show or hide columns.
- Open a customer: click anywhere on a row, or click the View button in the Actions column. Either takes you to that customer’s Customer Summary page.
What the list shows
| Column | Shown by default |
|---|---|
| Customer (name) | Yes |
| Address | Yes |
| City | Yes |
| State | Yes |
| Yes | |
| Phone | Yes |
| Actions (View button) | Yes |
| Zip | No — turn on via the column menu |
| Address 2 | No — turn on via the column menu |
| Customer ID | No — turn on via the column menu |
The list is paged at 20 customers per page by default; use the page-size picker at the bottom to switch to 40, 50, 75, or All.
Toolbar actions
- Excel Export / PDF Export — download the current list as a spreadsheet or PDF (the PDF exports in landscape).
- Search — free-text search across the list.
- Mail Merge — runs a mail merge on the customers matching your current filter (the whole filtered set, not just the visible page). See Mail Merge (Customers).
What happens next
Opening a customer takes you to their Customer Summary — the hub for that customer’s contact info, job sites, jobs, appointments, estimates, invoices, contacts, and notes. Exports download immediately in your browser.
Tips & best practices
- Filter first, then mail merge. The Mail Merge toolbar button picks up your active filter, so filtering to (say) one city or classification is how you target a merge.
- Use column show/hide to build the view you actually work with — e.g. turn on Zip if you route by ZIP code — then export it.
- Search matches partial text, so a few letters of a street name or the last 4 digits of a phone number are usually enough.
Troubleshooting
- A customer you expect isn’t in the list — check for an active search term or column filter and clear them. Also confirm the customer was created (see Create a Customer); customers belonging to a different company login will never appear.
- “An error occurred while retrieving customers” — the list failed to load. Refresh the page; contact support if it persists.
- Mail Merge says “No customers to merge” — your current filter matches zero customers. Adjust the filter and try again.
- Mail Merge is blocked at 5,000 — a merge run is limited to 5,000 records. Narrow the filter and run it in batches.
Related articles
- Create a Customer — add a new customer account
- Customer Summary (Profile Page) — what you’ll find when you open a customer
- Update Customer — edit a customer’s details
- Mail Merge (Customers) — generate letters, PDFs, or an email campaign for filtered customers